
Showing posts with label simple hacks. Show all posts
Showing posts with label simple hacks. Show all posts
Monday, April 30, 2012
TimeLapse Camera hack
Thursday, April 26, 2012
Oscilloscopes and Arduino's
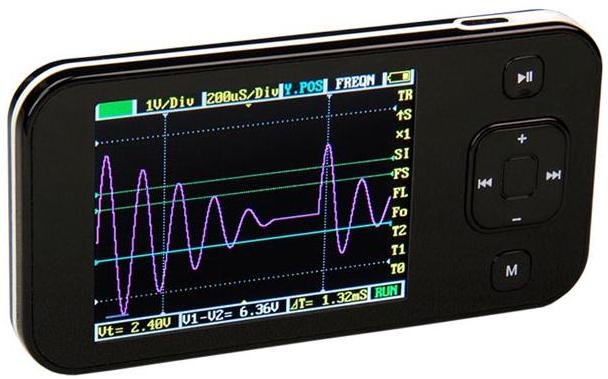 |
| ARM Oscilloscope DSO-201 Nano (Mini 2.8in) Digital Oscilloscope |
I figure building a really simple oscilloscope with an Arduino will let me learn the basics of how to use one. Plus if it does turn out to be useful I'll probably have a better idea of what kind of specs I'll need as there seems to be a big price difference depending on the sampling rate and number of inputs it has. Although in the $400 price range they start to come with a few more bells and whistles. Seems like that might be around the price range if I wanted one that would give me a little room to grow into it as I keep building bigger and ever more complicated circuits.
 |
| OWON SDS7102 100Mhz Oscilloscope 1GS/s 8" Color LCD USB FFT 2 + 1 Channel |
Friday, October 14, 2011
Cheap Touch Interface for anything (A.K.A. Johnny Lee is too smart)
I've been working on a pretty simple touch interface using an irLED (infrared LED)pen, a Wiimote from the Nintendo Wii and a cheap USB blue tooth dongle to turn my projector into a really big kick ass touch screen. This is all based around the YouTube video at the top of this post by Johnny Chung Lee showing off the whole idea and offering up some basic code and instructions on how to do it all at this website http://johnnylee.net/projects/wii/ He's got a few other really cool hacks you can do with a Wiimote as well that are really worth checking out. The 3D head tracking display that converts any video source into this crazy quasi 3D effect is pretty amazing.
My hope is that I could temporarily hang my projector from the ceiling with a Wiimote and project an image onto my white kitchen table to play board games and such. While it sounds like great fun I think it would require a lot of programming to get to that point as well as a few other technological hurdles to get around. Building the irLED pens I was thinking what it might take to get a second button and irLED light on the pen to create a modified right click ability with the pen. That's pretty much my weekend project, if I can get it working I have a handfull of friends that are teachers that might be interested in turning their projector into a touch system for under $50 dollars.
Friday, June 3, 2011
I swapped out some components on my Cygolite bike headlamp
 I bought a nice front facing bike light a few years ago from a local bike shop, it was the Cygolite Rover LED II. It was super bright had 3 brightness settings and a flash option. Living in Alaska I used it all the time in the fall and spring when the days are short, but rarely in the summer since it stays light out for so long. So this spring when I went to use the light I got about 10 minutes into my ride when the LED switch on top of it started flashing and it shut off. Since I still hadn't gotten out of the downtown area I was easily able to ride back to my apartment since there were street lights everywhere.
 When I got back home I grabbed the battery pack that is shaped like a water bottle that fits in my bikes holder. Doing a quick search online I found the replacement was going to cost $40 plus about $12 in shipping to Alaska. There were a few things I didn't like about this battery pack though. First of all the charger for it had no auto shut off so the manual tells you to remember to unplug it after charging it for 4 hours so you don't overload the batteries. This was always a big pain in my arse as I used it in the evenings for rides so if I plugged it in after the ride I'd be expected to unplug the charger sometime in the middle of the night. The other issue was not using it in the dead of winter or most all summer I would forget to plug it in every few weeks to charge it which probably led the batteries to an early death since recharables don't like being drawn down to 0 power and staying that way for months as it prevents them from being able to fully charge. Plus once the batteries died while I was on a ride I was SOL unless I wanted to pick up a second one.
My solution was to crack the thing open and see if I could replace the batteries in it with a 4 AA battery cage. The batteries they were currently using were NiMH 1.2volt (2500mA) wired in series to get the 4.8 volts. They were the same circumference as a standard AA battery but were about a half inch longer. I have packs of Sanyo Eneloop (NiMH 1.2V 2000mA) rechargeable I use for almost everything (another post where I can gush about how much I love eneloop batteries sometime). They had a little less capacity then the ones that came with it, but if the light died while I was on a trail I could easily swap out the batteries with some others. When I go for bike rides I usually have a back pack I take with that has my Cannon camera that uses 4xAA batteries. I also usually carry 4 extra batteries on top of that. So extra batteries to swap out isn't that big of a deal. After hooking up my new battery cage and testing it last night I found on the brightest setting I could get exactly 2 hours of light from my eneloop batteries which is long enough for most of my late night bike rides especially since when I'm riding through populated areas with street lamps I usually turn the brightness down to the lowest setting as I only need the light to help cars see me when riding in and out of the city so one set of batteries should last 2 - 3 hours depending on brightness settings.
Total cost to fix my battery pack was about $2 for the battery cage (plus the rechargeable batteries that I already had plenty of). Now it's far more versatile for me since I can swap out rechargeables in it when I need. I took pictures and documented the process since it was a really simple fix. I might post it up on Instructables.com as my first post. Seems like the same could be done for a lot of remote control toys or possibly even power tools that use 4.8 or 9.6 volt battery packs as well.
Subscribe to:
Posts (Atom)